
Wikipedia:Graphics Lab/Resources/Draw topological maps
The purpose of this tutorial is to show how to create a vector graphics topological map of a single rapid transit, tram, railway, waterway, road or long footpath, etc, route. Topological maps are straight-line diagrams or schematics that display not only the routes, but also other information such as stations and travel zones (as in the case of the London Underground Tube map). The maps are not drawn to scale, and distance and direction are subject to change and variation, but the relationship between points is maintained.
You can also create a map of a single route by using the methods described at Wikipedia:Route diagram template; however, that generates a route diagram in an infobox, which may not always be preferable, and can take up a lot of space in an article. Using the methods described here, you will be able to create a route diagram image that can be placed in an article as any other picture file can.
To follow this tutorial, you will need to download Inkscape (http://www.inkscape.org) (version 0.46 or later - older versions may not include all the necessary functions), a free and open source vector graphics editor application. It can run on Linux, Mac OS X, and Microsoft Windows operating systems.
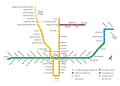
In this tutorial, we will make a topological version of the London Underground's Bakerloo line. The image that is currently used in the Bakerloo line article uses the following image which was drawn using data from OpenStreetMap collected using portable GPS devices. The stations and lines are more geographically accurate than in a pure topological map.

Creation of the map[edit]

- 1. Open Inkscape.

- 2. Rename the first layer:
- Click on Layer -> Rename layer... and name it "Line".

- 3. Create three additional layers:
- Click Layer -> Add layer... and name this layer "Station points". Repeat twice, naming the layers "Station names" and "Key". Select the bottom layer, "Line".

- 4. Draw a straight line:
- Click on the Draw Bezier curves and straight lines (Shift + F6) button. In the work area, left-click to start the line, and right-click to end the line. Hold down CTRL to ensure the line is completely straight with a 0.00° angle.

- 5. Thicken the line:
- Click on the Edit objects' colors, gradients, stroke width, arrowheads, dash patterns... button. Select the Stroke style tab, increase the line width (12.000 pixels in this tutorial), and select the Square cap button.

- 6. Colour the line:
- Select the Stroke paint tab, then the Flat color button, and choose a colour for the line. (In this tutorial it is hex quadruplet #996633FF, the official TfL colour for the Bakerloo line[1]).

- 7. Lock the layer:
- Click the Padlock button to lock the "Line" layer.

- 8. Create a station point:
- Select the "Station points" layer and click on the Create circles, ellipses, and arcs (F5) button. Left-click in the work area and hold down the CTRL button to create a perfect circle.

- 9. Resize the circle:
- Click the Select and transform objects (F1) button. Ensure the width and height of the circle are the same size, and the diameter is twice the size as the width of the line (24.000 pixels in this tutorial); if they are not, change them.

- 10. Colour the circle:
- Click on the Edit objects' colors, gradients, stroke width, arrowheads, dash patterns... button. Select the Fill tab, then the Flat color button, and colour in the center of the circle to make it the same colour as the line (Hex #996633FF) For a simple circle with only an outline, make the filling white (Hex #FFFFFFFF - ensure the A-value is 255 otherwise it will be transparent, which appears white in Inkscape)

- 11. Colour the circle outline:
- Select the Stroke paint tab, then the Flat color button, and colour the outline of the circle the same as the line (Hex #996633FF). If you are making a "simple circle", colour the outline black (RGBA 0, 0, 0, 255 or Hex #000000FF)

- 12. Thicken the circle outline:
- Select the Stroke style tab, and make the thickness of the circle outline half that of the width of the line (6.000 pixels in this tutorial).

- 13. Duplicate the circles:
- Click on the Duplicate selected objects button to create additional circles. These new circles appear on top of the original, so you will have to move them to see them.

- 14. Create a short vertical line:
- Press Shift+F6 and create a straight, vertical line. Press Shift+CTRL+F. Select the Stroke paint tab and shade the line the same colour as the main line (#996633FF). Select the Stroke style tab. Change the width to 12 pixels, and click the Square cap button. Resize the height of the line so it is 1.5 times the width of the main line.

- 15. Duplicate the small lines:
- Click on the Duplicate selected objects button to create additional lines. These new lines appear on top of the original, so you will have to move them to see them.

- 16. Place the station points on the line:
- Place the circles, discs and lines in their correct places on the line. Delete any unused markers.
- Note: In this tutorial, we have referenced the Bakerloo line article and the articles of each of the stations on that line to determine which markers are being used for which purpose; the small lines identify minor stations, the shaded discs identify more major stations or those that are used on one or two other lines, and the black circles identify interchange stations that are used on many other lines or other connecting services such as Network Rail or London River Services. DO NOT simply duplicate official maps that may be copyrighted – your image will be breaching that copyright and it will not suitable for Commons or Wikipedia.
- Place the circles, discs and lines in their correct places on the line. Delete any unused markers.

- 17. Align the station points:
- Select all the station points by either holding CTRL and clicking on each one or by pressing CTRL+A. Click the Align and distribute objects (Shift+CTRL+A) button. Select the alignment necessary to space the circles equally, and to align their centers. You may have to click more than one of the buttons to achieve this.

- 18. Lock the layer:
- Click the Padlock button to lock the "Station points" layer.

- 19. Write the station names:
- Select the "Station names" layer. Click on the Create and edit text objects (F8) button. Click anywhere in the work area, and type the name of the first station. Select another place in the work area and type another station name. Don't press "Enter" to start a new line for each name you won't be able to move them around. For each new station name, you must write it in a new area.

- 20. Format the names:
- Click the Text properties (Shift+CTRL+T) button to format the text. Choose a free fontface, such as the free DejaVu type (Sans or Serif) which is completely supported by Wikimedia (if you decide to use this font, choose the Condensed sub-types as the standard ones can give problems in rendering). Select your desired style and size (in this tutorial, we use Normal and font size 30 for regular stations, and Bold for interchanges).

- 21. Rotate the names:
- Select all the station names by either holding CTRL and clicking on each one or by pressing CTRL+A. Click on Object -> Transform... (Shift+CTRL+M). Select the Rotate tab and choose an angle the text should be at (in this tutorial, it is 45°). To rotate in the opposite direction, make it a negative figure.

- 22. Align the names:
- Move the station names next to the station points, and click the Align and distribute objects (Shift+CTRL+A) button. Select the alignment necessary to space the names equally, and to align the initial letters. You may have to click more than one of the buttons to achieve this.

- 23. Add other icons
- Download any suitable icons from Wikipedia's Route diagram templates such as the ones at Wikipedia:Route diagram template/Catalog of pictograms/others, or Wikimedia Commons.
- In Inkscape, click on File -> Import (CTRL+I) and select the downloaded files.

- 24. Resize the icons
- Resize the imported images, ensuring the proportions are kept intact by holding down CTRL as they are adjusted, and put them in their correct places.

- 25. Lock the layer:
- Click the Padlock button to lock the "Station names" layer.

- 26. Create a Key:
- Select the "Key" layer. Make a copy of each of the imported icons, reduce their sizes and arrange them in one of the corners of the image. Add explanatory text so anybody using the image understands the icons. Press Shift+CTRL+A and align the text and icons.

- 27. Add the final touches:
- Select the Create rectangles and squares (F4) button. Draw a square around the key. Import or draw an icon to identify the line.

- 28. Resize the image:
- Click on Object -> Unlock all. Select every image element by either holding CTRL and clicking on each one, or by pressing CTRL+A. Click on File -> Document properties... (Shift+CTRL+D). Click the Fit page to selection button. Save the document and upload it to Commons.
The finished product[edit]

Examples of topological maps[edit]
-
-
 Featured picture of the Greater Dublin Rail Network showing Suburban Rail, Luas and proposed Metro and Commuter lines.
 -
 Madrid Metro map (Featured picture)
 -
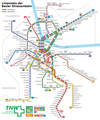
 Topographical rapid transit network map of Munich 2006
 -
 Subway network map with neighborhoods in Frankfurt and additional information
 -
 Map of the Basel streetcar network
 -
 Map of San Diego Trolley routes
 -
 Alternative San Diego Trolley map
 -

-
 Map of the Staten Island Railway
 -
 Map of TTC Subway in Toronto
 -


Rapid transit at Wikimedia Commons
References[edit]
| This page contains a translation of Didacticiel pour dessiner une ligne de métro from fr.wikipedia. |